SAP Basis Automation
Leveraging SAP Transport Automation with IT-Conductor
Managing transport requests is challenging. See how SAP Transport Automation can transform your implementation projects.
A solution to automate the process of migrating SAP on MSSQL to AWS. Read more to learn more.
IT-Conductor has developed several solutions to help organizations in their digital transformation, working on automating the most complex and time-consuming tasks. In the continuous process of adding new solutions to the IT-Conductor’s service catalog and working in partnership with different cloud providers, a solution to automate the process of migrating SAP on MSSQL to AWS has been developed.
In this blog post, we will walk you through each step of the VM provisioning, the SAP installation process on Windows Server 2019 and MSSQL, preparing the disk to install MSSQL and SAP NetWeaver, transferring and restoring the database, and cleaning up the server.
We will emphasize the adaptability of our solution by using Terraform and Ansible scripts that are completely customizable and can be tailored to meet the specific needs of any customer. Moreover, the use of Terraform and Ansible provides a transparent and auditable infrastructure management process, ensuring security and compliance with industry standards.
Let's get started!
Table of Contents
Orchestration Workflow in Detail
Step 1: Provision Windows VM on AWS
Step 5: Prepare for SAP Installation
Step 7: Transfer MS SQL Backup Files
Migrate SAP on MS SQL to AWS with IT-Conductor
To access the process definition developed for this demo scenario, navigate to Tenant Service Grid > Process Definitions > Windows-MSSQL on AWS-ag.
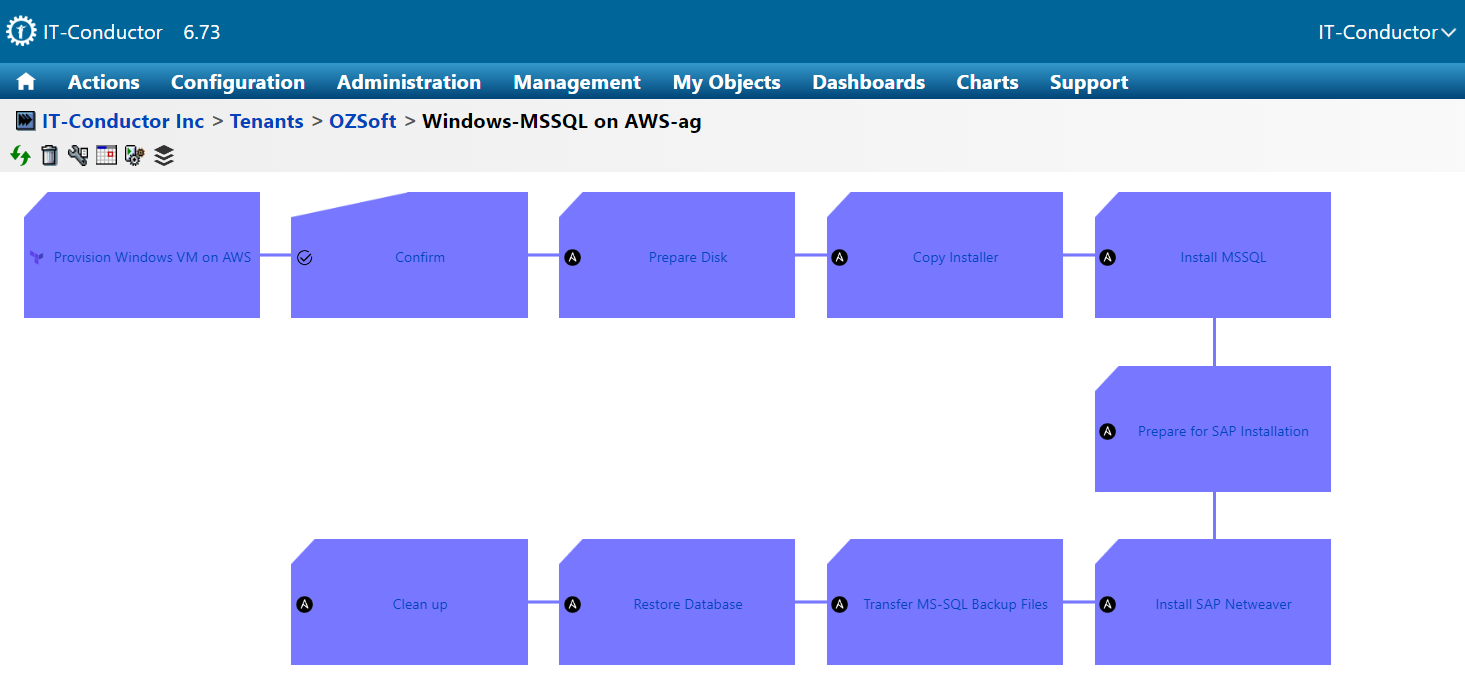
Figure 1: SAP on MS SQL Migration to AWS Process Definition
For this example, we used our tenant called “OZSoft” but the process can be cloned and applied to any customer after being onboarded to IT-Conductor as a tenant. IT-Conductor creates and clones the Git repository for each tenant who needs to leverage these types of automation runbooks.
We also used the following data files:
aws_vm_windows.json: contains information related to windows VM provisioning
hosts.yml: file contains host details that will be used by Ansible
/ID_RSA and /ID_RSA.pub: used for authentication
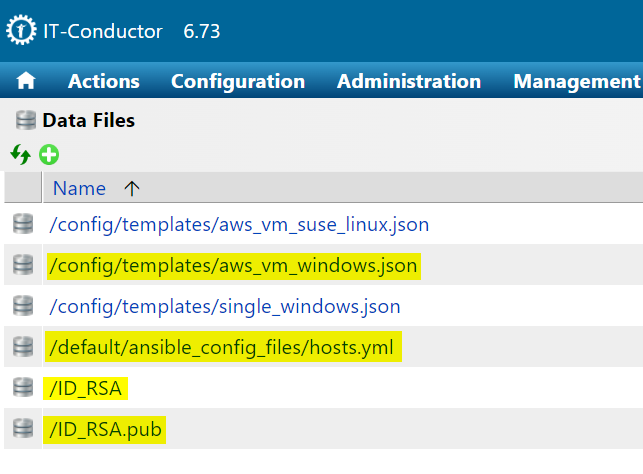 Figure 2: Process Automation Data Files in IT-Conductor
At IT-Conductor, we believe in making the SAP installation process as simple and straightforward for our customers as possible. That is why we developed the IT-Conductor Form, a simple and user-friendly interface through which users can enter all of the variables required for the Ansible playbook required for the SAP installation. Customers can use this form to adapt the installation process to their specific needs, ensuring a smooth and successful outcome.
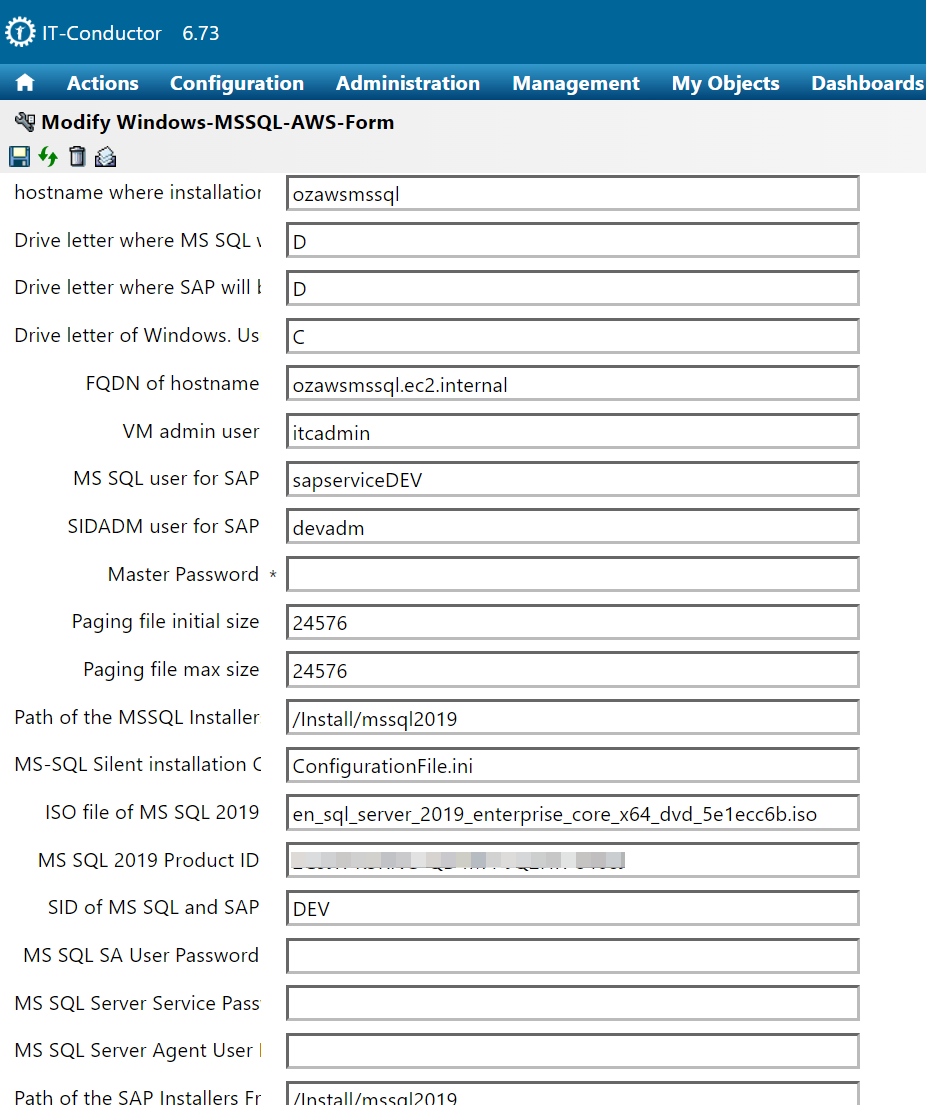
Figure 3: IT-Conductor Form for Customized Ansible Variables used during SAP and MS SQL Installation
We have placed all the playbooks on IT-Conductor’s private GitHub Repository which can be cloned and customized for any project.
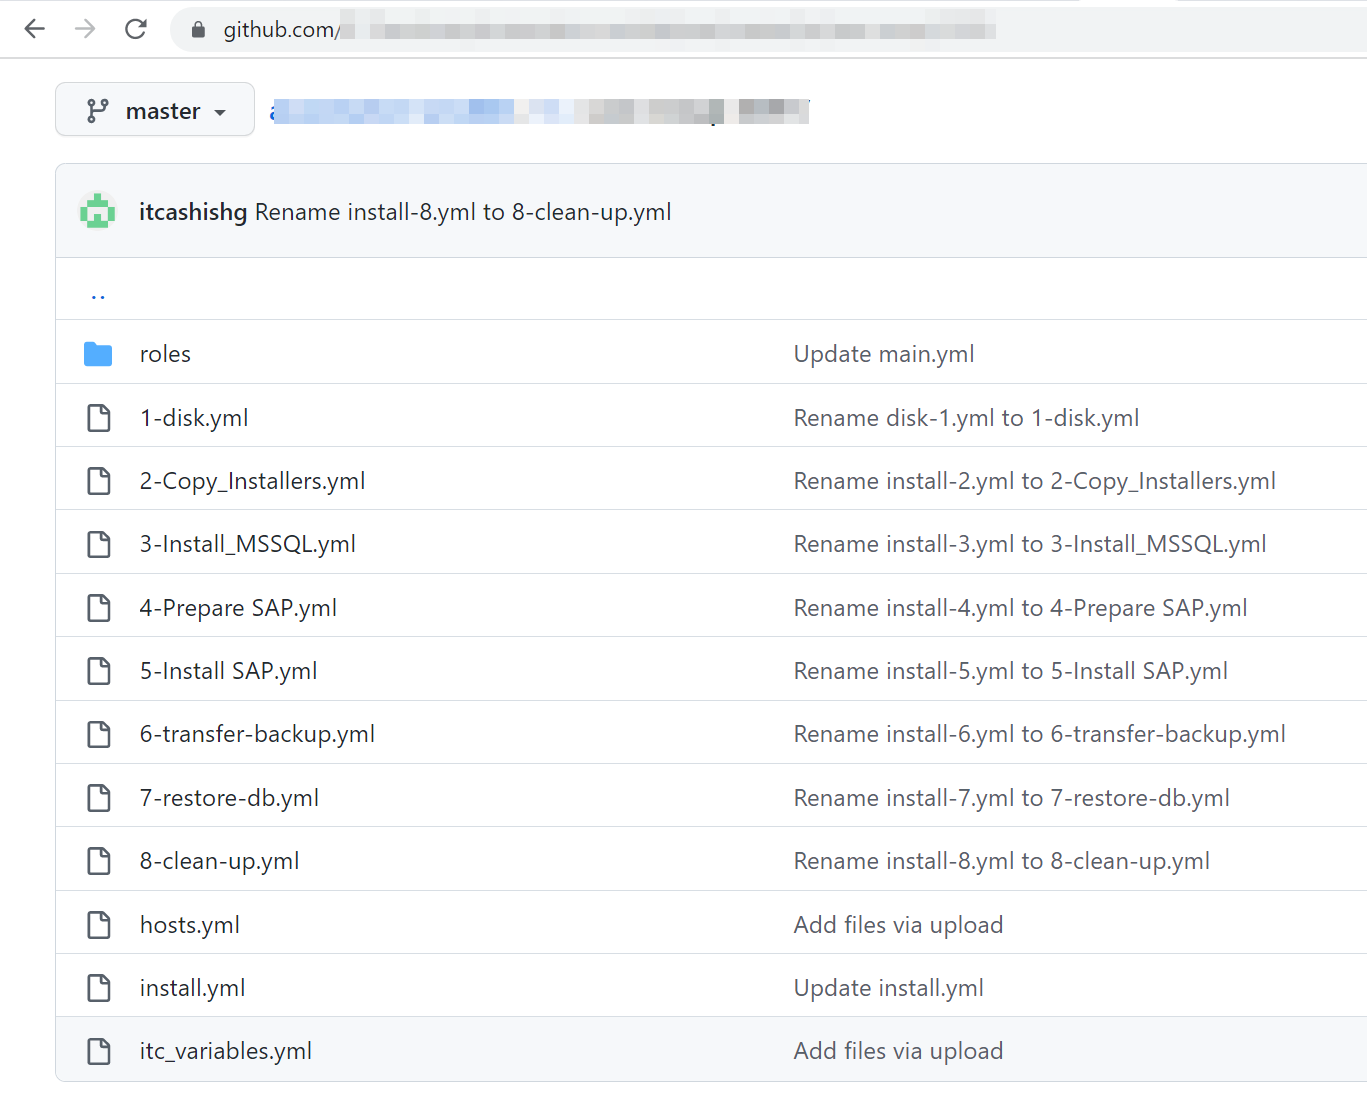 Figure 4: IT-Conductor's Git Repository project for SAP on MS SQL Migration to AWS
Now, let’s look into each step/activity of the process definition in detail.
In this step, we will use Terraform to create a Windows Server 2019 virtual machine on AWS. Terraform is an Infrastructure as Code (IaC) tool that enables us to automate the process of creating, updating, and deleting infrastructure resources.
For this demo scenario, we assume that the target cloud infrastructure such as VPC and its subnets already exists per the AWS best practices blueprint and we updated the code in the “aws_vm_windows.json” file as shown below.
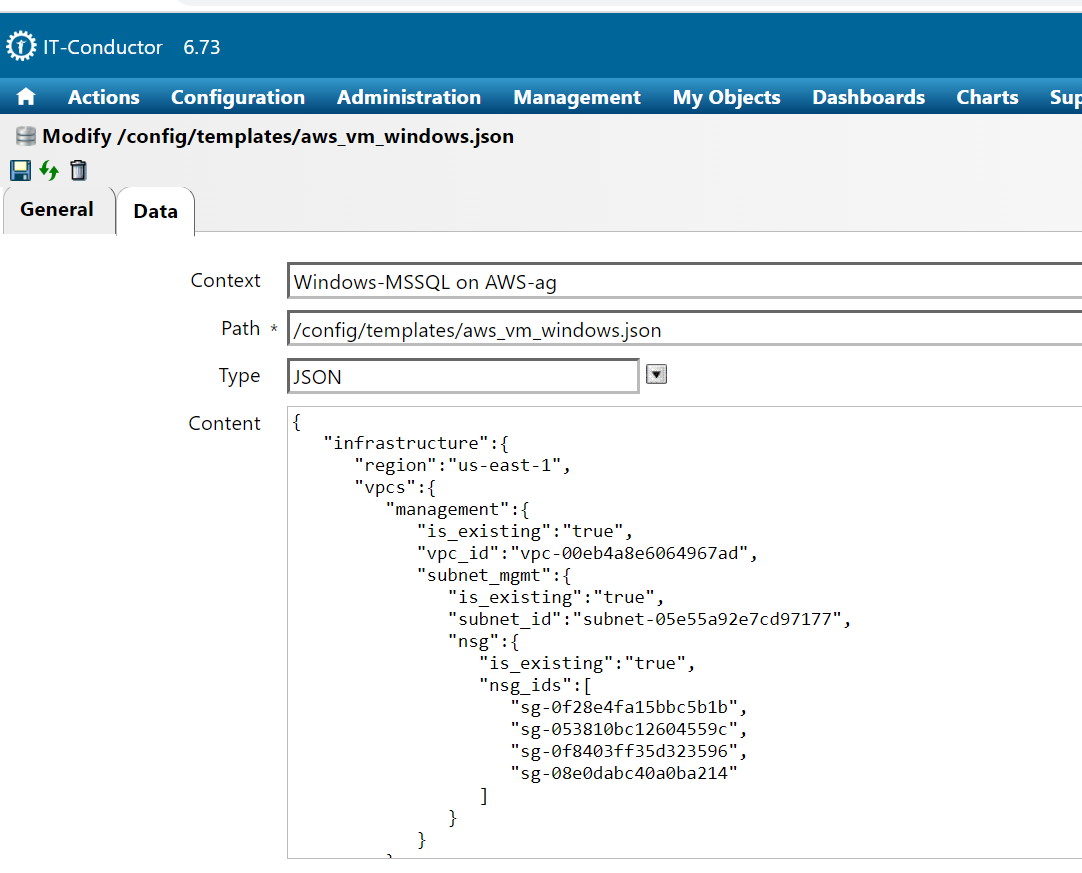
Figure 5: Terraform code for Deploying the Windows VM on AWS
This step is crucial in setting up the virtual machine for SAP installation. The following tasks will be performed in this step:
Initialize the disk: The first step in preparing the disk is to initialize it so that it is ready for use.
Create a partition: Once the disk is initialized, a partition will be created.
Format and label the partition: The next step is to format the partition as NTFS and label it.
Retrieve the Ethernet name: The Ethernet name will be retrieved, which is necessary for the next step.
Disable IPv6 for Ethernet: IPv6 can cause compatibility issues with SAP so it will be disabled.
Install .NET Framework 3.5: SAP requires the .NET Framework 3.5 to be installed, so it will be installed along with all the related features and sub-features.
Rename the Windows machine: The Windows machine will be renamed to give it a descriptive name.
Restart the Windows machine: Finally, the Windows machine will be restarted to ensure all changes take effect.
In this step, the SAP installation files will be copied to the virtual machine.
SAP requires a database to store its data and Microsoft SQL Server 2019 was used for this purpose. In this step, MS SQL will be installed on the virtual machine. To do this, the following tasks will be performed:
Mounting the ISO
Installing MS-SQL 2019
Before SAP can be installed, some preparations need to be made. In this step, a folder named "Export" will be created and the file containing SAP Netweaver will be unzipped to extract the SWPM installation tool.
After the preparations are complete, the installation of SAP NetWeaver will proceed. This is the core component of the SAP system, and it will provide the platform for all other SAP applications.
To install SAP Netweaver, the “sapinst.exe” will be executed as a silent installation using a parameter file, which can be customized with SAP-supported variables.
Once the installation of SAP NetWeaver is complete, the on-premise MS SQL backup files will be transferred to the virtual machine. This will enable the restoration of the database and get the SAP system up and running. To do this, the source MS SQL backup will be copied from the AWS Gateway to the Windows Server.
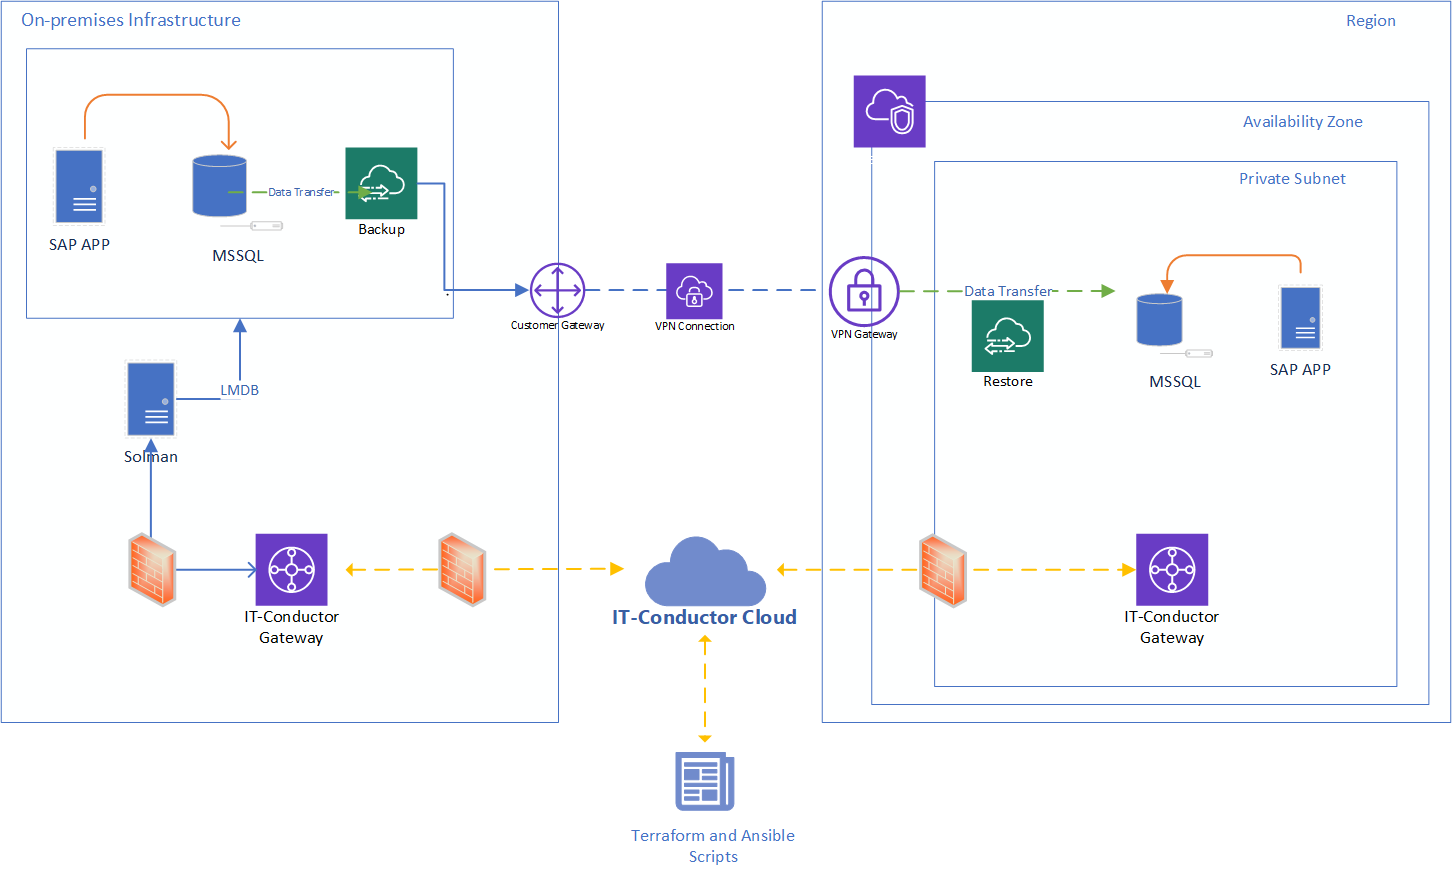
Figure 6: Automated MSSQL Migration from On-premises to AWS
After successfully installing SAP NetWeaver, it is time to restore the database. This is a crucial step as the data is the backbone of any enterprise software and hence its restoration is imperative for the smooth operation of the system. Here are the steps to restore the database:
Stop SAP Central Instance (CI): Before restoring the database starts, it is necessary to stop the SAP Central Instance (CI) to avoid any data loss or corruption during the restoration process.
Stop SAP ASCS instance: It is important to stop the SAP ASCS (Application Server Central Services) instance as it is also involved in database operations.
Set the database to offline mode: Once the SAP instances have been stopped, it is time to set the database to offline mode. This step is taken to ensure that there are no active connections to the database during the restoration process.
Restore the database: Now that the database is in offline mode, it is time to restore it from the backup files that were transferred from the AWS Gateway to the Windows Server in Step 7. This process will involve restoring the database from the backup files to the MS SQL database.
Set the database to online mode: Once the restoration process has been completed successfully, it is important to set the database to online mode.
Start the SAP Central Instance (CI): Finally, it is time to re-start the SAP Central Instance (CI). This will complete the restoration process and bring the SAP system back online for use.
Once the database restoration is complete, it is important to perform a cleanup of the system. This will help minimize disk space usage and keep the server clean and organized. The following files and folders that were used during the installation process are no longer needed and can be deleted to free up disk space.
SWPM (Software Provisioning Manager) folder
EXPORT folder
All MS SQL installers
WinRM script
All SAP installers
Now we will run the process definition. The Removal Age refers to the instance of process orchestration and is not to be mistaken for the removal of the provisioned system.
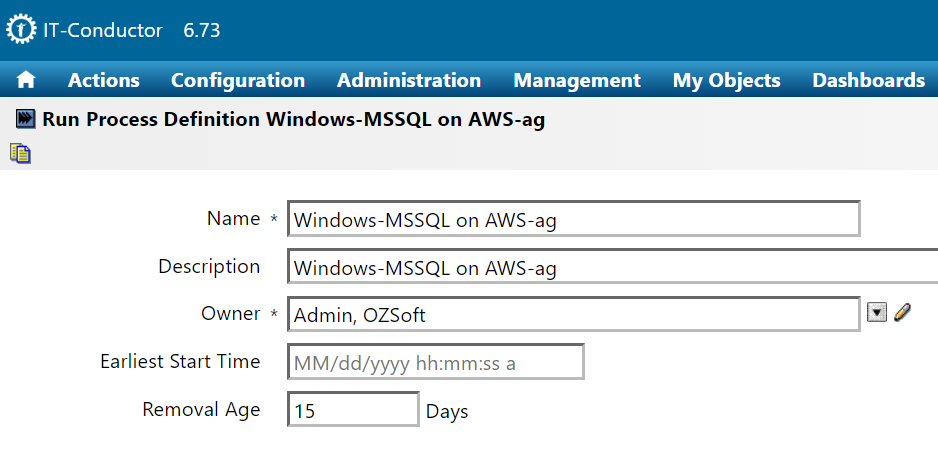 Figure 7: Instantiate the Automation Process to Start the Deployment and Migration
Once the process definition is in a running state, the blocks will start changing color. After successful completion, the blocks will turn green.
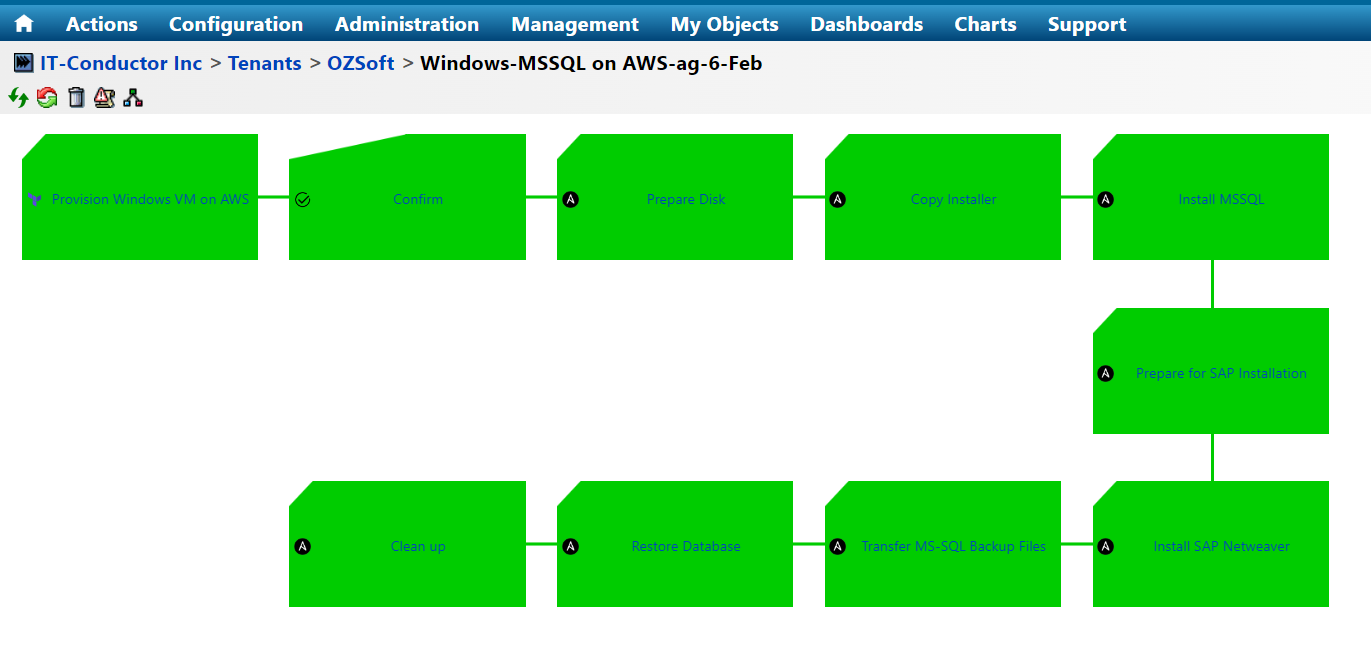 Figure 8: Complete Execution of Deployment and Migration Automation
A manual system migration normally takes up to 3 weeks from assessment to deployment to migration. With IT-Conductor, we reduced this time to under 24 hours.
IT-Conductor automation scripts eliminated 80% of the manual tracking and effort while also providing auditing of the deployment and migration processes at each stage, which is useful for operations and compliance.
Reduced business downtime by 90%.
With a single step during the automated migration and with minimal effort we also obtained:
HW refresh
OS release Update
DB release Update
Once migration is done, the migrated systems must be added to IT-Conductor for monitoring. By doing so, you can get full insights into the system's health and performance.
IT-Conductor collects information regarding active transactions, locks, checkpoints, user connections, timeouts, free memory, and buffer cache hit ratio. Additionally, top expensive queries are available so you can keep track of what is happening in the system in real-time.
IT-Conductor Monitoring offers the following four types of monitoring for the migrated system.
The Hostagent monitoring will provide details on the hardware health of the system, such as CPU usage, disk space, and memory usage.
The SAP Application monitoring will show data on the performance and status of the SAP application running on the migrated system.
The MS SQL Server monitoring will provide insights into the health and performance of the database server, such as the number of open connections and the query response time.
Finally, the Windows Server monitoring will show metrics related to the operating system, such as the event logs, service status, and disk usage.
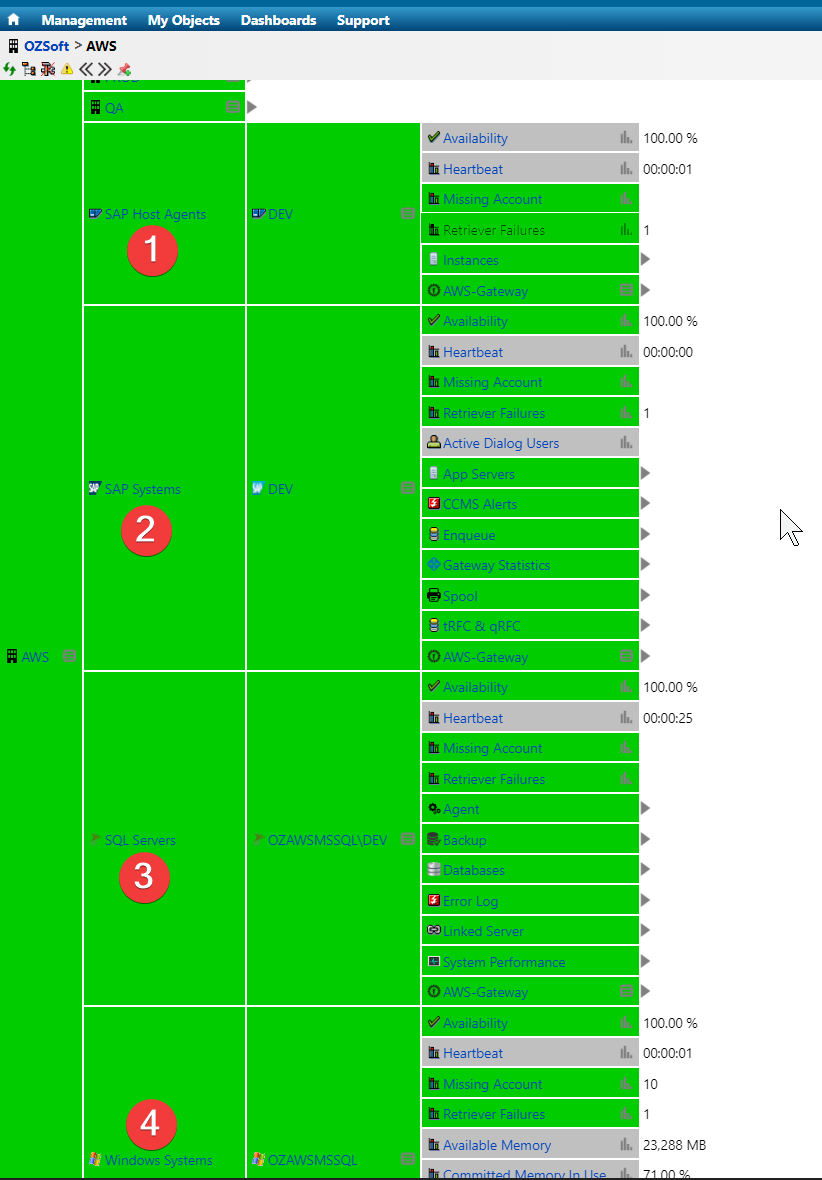
Figure 9: IT-Conductor Service Grid
SAP on Windows Server 2019 and MSSQL on AWS installation is a complex process that requires a thorough understanding of various technologies and tools. You can ensure a smooth and successful SAP installation by following the steps outlined on this page. IT-Conductor can assist you whether you are a small business looking to implement SAP for the first time or a large enterprise looking to modernize your IT infrastructure. Join us as we dive into the world of SAP IT Process Automation for more efficient and high-quality cloud migrations.

Managing transport requests is challenging. See how SAP Transport Automation can transform your implementation projects.
Automate SAP transport request management to simplify the process of managing transport requests in SAP. Learn more.
We are excited to announce that IT-Conductor is now listed in the Azure Active Directory (AAD) Application Gallery!